This recipe creates a new kiosk setup. For an existing Pi, back up src/instance/ and the protected environment file first. Don’t recreate the kiosk account or replace its signing key. Apply the relevant dependency recovery, cursor and audio changes, and follow maintenance for an update. Reading an updated guide does not change the files on your Pi.
FIRST, SEE THE WHOLE PICTURE
Three connections.
Three different jobs.
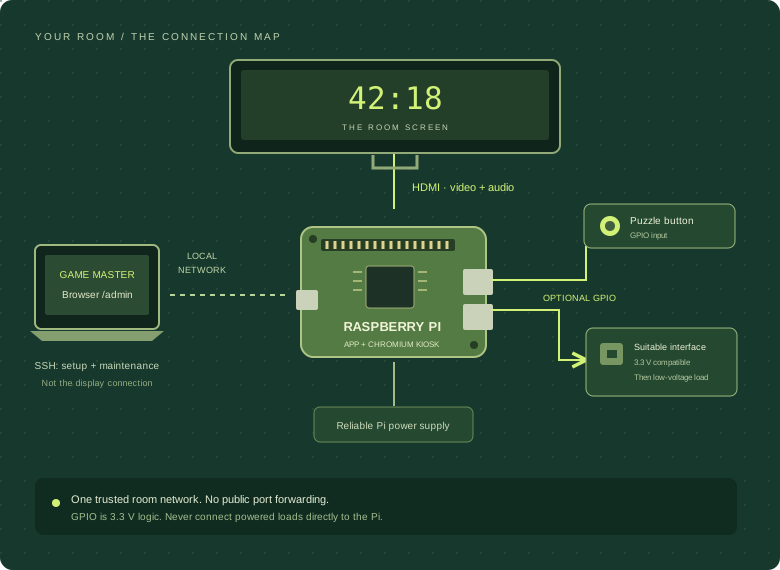
This setup uses Raspberry Pi OS Lite (64-bit) and a minimal X11 session, not a full desktop. Use a Pi Zero 2 W or newer. A Pi 4 with at least 2 GB RAM is a good overall choice; Pi 3B+, Pi 5 and Pi 400 also work.
Older single-core Pis lack CPU features required by current Chromium. A Pi Zero 2 W works, but the application can take 30–40 seconds to start after a cold boot. The kiosk below waits for it.
Have a microSD card, reliable model-appropriate power supply, HDMI cable or adapter, screen, and local network ready. Use wired networking where available.
Flash the card. Meet your Pi.
Use Raspberry Pi Imager to write Raspberry Pi OS Lite (64-bit). Before writing, set a hostname, administrator account, Wi-Fi country and credentials if needed, and enable SSH. Boot the Pi, then connect from your laptop’s terminal or PowerShell:
ssh <admin-user>@<pi-hostname>.localReplace both placeholders with your Imager settings. If .local doesn’t resolve, use the Pi’s IP from your router’s device list. Verify the SSH host identity when connecting. The administrator account runs the sudo commands; the separate kiosk account only runs the screen.
Install the system packages.
Run on the Pi as your administrator. These packages provide Chromium, X11, audio, and GPIO build support.
sudo apt update
sudo apt full-upgrade -y
sudo apt install -y \
  build-essential curl git pipx python3 python3-dev python3-venv \
  python3-lgpio alsa-utils raspi-utils-core swig liblgpio-dev \
  nginx chromium xinit xserver-xorg x11-xserver-utils
python3 --version
Python must be 3.11 or newer. build-essential, swig and liblgpio-dev are needed to build the Python GPIO extension.
raspi-utils-core provides vcgencmd on Trixie and updated Bookworm. The older libraspberrypi-bin package has no installation candidate on Trixie. If that stopped your setup, rerun the full install command above with the corrected package name; don’t assume the other packages were installed. Let APT choose the native architecture rather than installing an :armhf replacement on a 64-bit Pi.
A dedicated kiosk account.
sudo adduser kiosk
sudo usermod -aG gpio,video,audio,input,plugdev kiosk
Do not add kiosk to the sudo group. Keep administrative work in your administrator account.
Install the app and Poetry.
sudo -u kiosk -H git clone \
  https://github.com/Your-Grandad/Escape-Room-Screen.git \
  /home/kiosk/escape-room-screen

sudo -u kiosk -H bash -c '
  set -e
  cd /home/kiosk
  pipx install poetry
  /home/kiosk/.local/bin/poetry --version
'

sudo -u kiosk -H bash -c '
  set -e
  cd /home/kiosk/escape-room-screen
  /home/kiosk/.local/bin/poetry env use python3
  /home/kiosk/.local/bin/poetry install --only main
  /home/kiosk/.local/bin/poetry run gunicorn --version
'
The explicit cd avoids permission errors in the administrator’s home directory. Poetry belongs to the account running the service; its path is /home/kiosk/.local/bin/poetry, not /usr/bin/poetry.
The final command must print a Gunicorn version from the kiosk user’s project environment. If it says Command not found: gunicorn, use the missing-Gunicorn recovery below. Installing it for your administrator account or system Python does not fix the service’s environment.
Set your application secrets.
Create a protected environment file. Replace the example admin password before starting the service.
sudo install -d -m 0750 -o kiosk -g kiosk /etc/escape-room-screen
SECRET_KEY="$(python3 -c 'import secrets; print(secrets.token_urlsafe(32))')"

sudo tee /etc/escape-room-screen/environment >/dev/null <<EOF
SECRET_KEY=${SECRET_KEY}
ADMIN_PASSWORD=replace-this-with-a-long-unique-password
EOF

sudo chown kiosk:kiosk /etc/escape-room-screen/environment
sudo chmod 0600 /etc/escape-room-screen/environment
sudo nano /etc/escape-room-screen/environment
Keep the key stable across restarts. Don’t share this file or commit it to Git. You can add GPIO environment mappings later after choosing unused pins.
Make the app start itself.
Create a systemd service. Gunicorn runs the app as the unprivileged kiosk user on 127.0.0.1:8080 and systemd restarts it on failure. The next step puts NGINX in front, so browsers won’t need a port in the URL.
sudo tee /etc/systemd/system/escape-room-screen.service >/dev/null <<'EOF'
[Unit]
Description=Escape Room Screen
Wants=network-online.target
After=network-online.target

[Service]
Type=simple
User=kiosk
Group=kiosk
WorkingDirectory=/home/kiosk/escape-room-screen
EnvironmentFile=/etc/escape-room-screen/environment
Environment=HOME=/home/kiosk
Environment=PYTHONUNBUFFERED=1
ExecStart=/home/kiosk/.local/bin/poetry run gunicorn --bind 127.0.0.1:8080 --workers 1 --worker-class gthread --threads 16 --timeout 120 --access-logfile - --error-logfile - "escape_room_screen.app:create_app()"
Restart=on-failure
RestartSec=5

[Install]
WantedBy=multi-user.target
EOF

sudo systemctl daemon-reload
sudo systemctl enable escape-room-screen.service
sudo systemctl restart escape-room-screen.service
restart also starts an inactive service, and applies the new command if you’re updating an existing installation. Gunicorn is included in the app’s Linux dependencies; if it’s missing, rerun poetry install --only main as kiosk from step 4.
On a Pi Zero 2 W, allow at least 40 seconds. Then check the service:
sudo systemctl status escape-room-screen.service --no-pagerConfigure NGINX in the next step before testing the port-free URL. Gunicorn’s loopback port 8080 is accessible only on the Pi. Keep one worker because live updates, timer scheduling and GPIO state belong to one process. The threaded worker allows ongoing Server-Sent Events connections alongside normal requests. Do not add --preload, which would initialise GPIO and timers in the master process.
Just the Pi’s address.
No port to remember.
A browser uses port 80 for HTTP when you don’t specify a port. Moving the app to 8080 alone would still require :8080. NGINX listens on port 80 and forwards requests internally to Gunicorn on 8080.
The screen and staff panel use the same port-free entry point. There is no need to expose the backend port on the room network.
The commands replace NGINX’s packaged default site. If your Pi already serves other websites, preserve their configuration and choose a suitable server_name rather than adding another default_server.
sudo tee /etc/nginx/sites-available/escape-room-screen >/dev/null <<'EOF'
server {
    listen 80 default_server;
    listen [::]:80 default_server;
    server_name _;
    client_max_body_size 8m;

    location / {
        proxy_pass http://127.0.0.1:8080;
        proxy_http_version 1.1;
        proxy_set_header Host $host;
        proxy_set_header Connection "";
        proxy_set_header X-Forwarded-For $proxy_add_x_forwarded_for;
        proxy_set_header X-Forwarded-Proto $scheme;
        proxy_buffering off;
        proxy_cache off;
        proxy_read_timeout 3600s;
    }
}
EOF

sudo ln -sfn /etc/nginx/sites-available/escape-room-screen \
  /etc/nginx/sites-enabled/escape-room-screen
sudo rm -f /etc/nginx/sites-enabled/default
sudo nginx -t && sudo systemctl enable --now nginx && sudo systemctl reload nginx
proxy_buffering off and proxy_cache off let /events deliver live timer and hint updates immediately. The 8 MB upload limit matches the app’s default request limit. If you change MAX_UPLOAD_MB, update client_max_body_size too, then validate and reload NGINX.
Once NGINX is configured, check the public entry point without a port and find the Pi’s room-network IP:
curl -I --max-time 10 http://127.0.0.1/
hostname -I
The expected response starts with HTTP/1.1 200 OK. The port-8080 check in troubleshooting is only for diagnosing the internal backend, not the public URL.
http://<pi-ip-address>/http://<pi-ip-address>/adminReplace the placeholder with the real Pi IP. You can also use http://<pi-hostname>.local/ and http://<pi-hostname>.local/admin if your network resolves that hostname, or a local DNS name pointing to the Pi. If .local doesn’t work, use the IP.
Sign in to /admin as admin with your configured password. Add standard operator accounts under Settings > Users.
If a Pi firewall is enabled, allow HTTP port 80 only from your trusted local network. Do not open port 8080 in a firewall or router. Don’t expose this plaintext HTTP admin panel to the internet or untrusted Wi-Fi; use a VPN, or a properly configured HTTPS deployment on port 443 with secure session cookies, for access beyond that network.
Updating an older Flask-based Pi installation?
Install NGINX from step 2, rerun the app’s Poetry install from step 4, replace the service command in step 6, and configure this proxy. Update both URLs in /home/kiosk/.xinitrc using step 8, then reboot. Keep your existing environment secrets and src/instance/ data; don’t recreate the kiosk account or replace the database.
Boot into the story.
Create the X11 session. It disables screen blanking, selects the monitor’s preferred mode, hides the pointer, waits for the NGINX entry point, and opens Chromium full-screen.
sudo tee /home/kiosk/.xinitrc >/dev/null <<'EOF'
#!/bin/sh
xset -dpms
xset s off
xset s noblank
xrandr --output HDMI-1 --auto

until curl --silent --fail http://127.0.0.1/ >/dev/null; do
  sleep 2
done

exec /usr/bin/chromium \
  --no-first-run \
  --noerrdialogs \
  --disable-infobars \
  --disable-session-crashed-bubble \
  --autoplay-policy=no-user-gesture-required \
  --alsa-output-device=hdmi:CARD=vc4hdmi,DEV=0 \
  --start-maximized \
  --window-position=0,0 \
  --window-size=1920,1080 \
  --kiosk \
  --incognito \
  http://127.0.0.1/
EOF

sudo chown kiosk:kiosk /home/kiosk/.xinitrc
sudo chmod 0755 /home/kiosk/.xinitrc
Check the actual HDMI output and audio device in the sections below. HDMI-1 and vc4hdmi are examples, not universal names. If your card is called vc4hdmi0, use that exact name instead in the speaker test, this Chromium flag and the default-audio configuration.
Start X11 from the local console.
sudo tee /home/kiosk/.bash_profile >/dev/null <<'EOF'
[ -f "$HOME/.profile" ] && . "$HOME/.profile"

if [ -z "$DISPLAY" ] && [ "$(tty)" = "/dev/tty1" ]; then
  while true; do
    startx -- :0 -keeptty -nolisten tcp -nocursor
    sleep 2
  done
fi
EOF

sudo chown kiosk:kiosk /home/kiosk/.bash_profile
sudo chmod 0644 /home/kiosk/.bash_profileDon’t run startx through SSH. It starts from the kiosk account’s local tty1 login. -keeptty avoids virtual-console permission errors.
-nocursor hides the pointer throughout the kiosk’s X11 session, even when the mouse moves. Input still works, and remote staff browsers keep their normal pointer. No separate cursor-hiding process is needed.
Enable automatic kiosk login.
sudo mkdir -p /etc/systemd/system/getty@tty1.service.d
sudo tee /etc/systemd/system/getty@tty1.service.d/autologin.conf >/dev/null <<'EOF'
[Service]
ExecStart=
ExecStart=-/sbin/agetty --autologin kiosk --noclear %I $TERM
EOF

sudo systemctl set-default multi-user.target
sudo systemctl daemon-reload
sudo reboot
After reboot: systemd starts the app → tty1 logs in as kiosk → X11 starts → Chromium opens the display. Protect physical access to the Pi; automatic console login is intended for a dedicated appliance.
Sound on. Screen ready.
Inspect the available audio devices. Use the exact CARD= and DEV= values listed by aplay -L in both the direct test and Chromium’s audio flag.
aplay -l
aplay -L
speaker-test -D hdmi:CARD=vc4hdmi,DEV=0 -c 2 -t wav -l 1
sudo -u kiosk -H speaker-test -D hdmi:CARD=vc4hdmi,DEV=0 -c 2 -t wav -l 1
The second test checks the account that runs Chromium. Stop any other running speaker-test with Ctrl + C before testing the app; it can keep the HDMI device busy. Set the kiosk user’s default audio to the same working device:
sudo -u kiosk tee /home/kiosk/.asoundrc >/dev/null <<'EOF'
pcm.!default {
    type plug
    slave.pcm "hdmi:CARD=vc4hdmi,DEV=0"
}
ctl.!default {
    type hw
    card vc4hdmi
}
EOF
Keep --alsa-output-device=hdmi:CARD=vc4hdmi,DEV=0 and the autoplay flag in /home/kiosk/.xinitrc. After changing the audio flag or .asoundrc, reboot to restart Chromium’s X11 session. Restarting only the web application service does not restart Chromium.
If the direct speaker test works, don’t change HDMI firmware settings just to fix browser playback.
If HDMI isn’t detected, the source guide recommends checking /boot/firmware/config.txt (or /boot/config.txt on older releases) for the lines below. Their effect depends on your Pi’s display driver; use the firmware and monitor settings appropriate to your model. Reboot after changes.
hdmi_force_hotplug=1
hdmi_drive=2
Upload custom event sounds under Settings > Sounds; without a custom file, the app uses a built-in tone. Test the main player display, not the deliberately silent embedded preview. Chromium’s --autoplay-policy=no-user-gesture-required allows live-update sounds without clicking the kiosk screen.
Monitor power control
command -v vcgencmd
sudo -u kiosk vcgencmd display_power
The admin monitor button uses vcgencmd display_power. If missing, install raspi-utils-core and restart the app. Driver and monitor support can vary: switching the HDMI signal does not guarantee every screen’s backlight enters standby.
Let your puzzles talk.
GPIO is optional. Start with a normally-open button or isolated dry contact for a room-complete event. The app uses BCM numbering, not the physical header position.
Open the GPIO pin guide for Pi Zero and standard boards for the full 40-pin map, suggested inputs, power rails, ground and shared-function warnings.
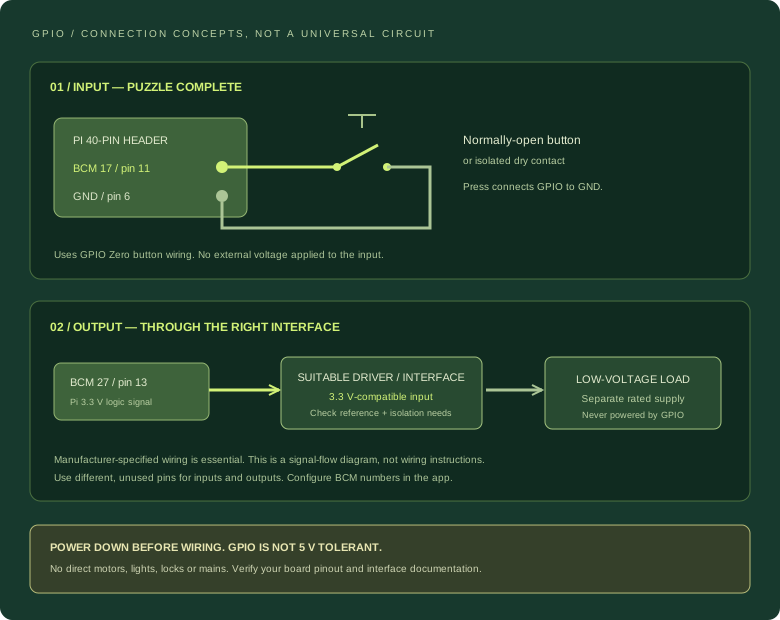
Power down before wiring. Never apply 5 V to GPIO, connect lamps, motors or locks directly, or wire mains from this diagram. Use a properly rated 3.3 V-compatible driver or isolated interface, separate load power, and manufacturer-specified wiring. Use a qualified installer for higher-voltage equipment and any safety-critical door control.
Input: a puzzle-complete button
Connect a normally-open button between BCM 17 (physical pin 11) and GND (physical pin 6), following GPIO Zero button wiring. In Admin > GPIO, map BCM 17 to Complete room. Saved mappings take precedence over environment mappings.
Alternatively, add this line to /etc/escape-room-screen/environment before configuring the admin mapping:
GPIO_INPUTS={"complete-room":17}For a monitor-toggle button instead, use GPIO_INPUTS={"display-toggle":17}. It is an alternative assignment for the same pin, not a second simultaneous use.
Output: a suitable interface
Use a different, unused pin such as BCM 27 (physical pin 13) for a suitable low-voltage interface. Check its 3.3 V logic compatibility, active-high/active-low behaviour and reference/isolated wiring before connecting. Add the mapping:
GPIO_OUTPUTS={"door-light":27}Restart to load environment changes:
sudo systemctl restart escape-room-screen.serviceTest with no team in the room. Don’t assign the same pin to an input and output. Avoid BCM 2/3, 14/15 and 18 while resolving conflicts, because overlays or peripherals may claim them. The GPIO page can pause mapped events; paused or invalid inputs are recorded as ignored.
BACK TO A WORKING SCREEN
When the setup fights back.
Command not found: gunicorn, repeated restarts and a blank kiosk
Gunicorn is missing from the service’s Poetry environment. NGINX returns 502 Bad Gateway because no backend starts, and the kiosk can stay blank while its launcher waits for a successful HTTP response.
Stop the restart loop and repair the dependency as kiosk inside the app directory. This also handles older checkouts that don’t declare Gunicorn yet:
sudo systemctl stop escape-room-screen.service
sudo -u kiosk -H bash -c '
  set -e
  cd /home/kiosk/escape-room-screen
  /home/kiosk/.local/bin/poetry add "gunicorn>=26.2.0,<27.0.0" \
    --markers "sys_platform != \"win32\""
  /home/kiosk/.local/bin/poetry run gunicorn --version
' && sudo systemctl restart escape-room-screen.service
Poetry updates the dependency declaration and lock file and installs the package in the correct environment. If it fails, keep the error output; don’t switch to a system-wide pip install or change the ports. Allow cold-start time, then test:
curl -I --max-time 10 http://127.0.0.1/Expect HTTP/1.1 200 OK. The waiting kiosk should then start Chromium. If the website works but the screen stays blank, investigate the local tty1/X11 startup separately.
NGINX shows 502, its welcome page, or live updates arrive late
Check the app first, then NGINX:
sudo systemctl status escape-room-screen.service --no-pager
sudo journalctl -u escape-room-screen.service -n 50 --no-pager
curl -I --max-time 10 http://127.0.0.1:8080/
sudo nginx -t
sudo systemctl status nginx --no-pager
curl -I --max-time 10 http://127.0.0.1/
Allow cold-start time on a Pi Zero 2 W. If the backend check fails, inspect the service logs and rerun the locked Poetry install if Gunicorn is missing. A welcome page usually means the new site is not enabled or the packaged default site is still selected. For delayed live updates, keep buffering/cache disabled and one threaded app worker. After editing configuration:
sudo systemctl daemon-reload
sudo systemctl restart escape-room-screen.service
sudo nginx -t && sudo systemctl reload nginx
Poetry not found, 203/EXEC, or home-directory permission denied
Install Poetry as kiosk and use /home/kiosk/.local/bin/poetry in the service. Switch to /home/kiosk before running it with sudo -u kiosk -H, or use sudo -iu kiosk for an interactive shell. After editing the service, run:
sudo systemctl daemon-reload
sudo systemctl restart escape-room-screen.service
startx is missing or cannot open virtual console 7
Install xinit xserver-xorg x11-xserver-utils. The expected command is /usr/bin/startx. Use startx -- :0 -keeptty -nolisten tcp -nocursor in the profile, not vt7. Reboot so it starts from the automatic local tty1 login, never through SSH.
A mouse pointer stays in the middle of the screen
Edit /home/kiosk/.bash_profile with sudo nano /home/kiosk/.bash_profile. Add -nocursor to the existing X11 startup line inside its loop:
startx -- :0 -keeptty -nolisten tcp -nocursorSave, then run sudo reboot to start a new X11 session. This disconnects SSH and briefly interrupts the display. The old guide’s unclutter --timeout 0.5 --start-hidden flags don’t match Debian’s classic package; remove that old line from /home/kiosk/.xinitrc. X11 now hides the cursor directly. Remove -nocursor and restart the session if you need a visible local pointer for debugging.
Chromium fills only part of the display
Inspect the active X11 output over SSH after the kiosk has started:
sudo -u kiosk DISPLAY=:0 XAUTHORITY=/home/kiosk/.Xauthority xrandr --queryFind the connected output and its preferred mode (marked +). Substitute those values here:
sudo -u kiosk DISPLAY=:0 XAUTHORITY=/home/kiosk/.Xauthority \
  xrandr --output HDMI-1 --mode 1920x1080
Make the correct output name persistent in the xrandr --output HDMI-1 --auto line in .xinitrc. If no supported mode is offered, see the original guide’s monitor-mode troubleshooting for your OS/driver; don’t force a mode the screen cannot use.
HDMI audio is silent or monitor controls are disabled
Check aplay -L, groups kiosk, the exact audio device in .xinitrc and /home/kiosk/.asoundrc, and the autoplay flag. If the speaker test works but the app is silent, repeat the test as kiosk and stop any other speaker-test process. Read the kiosk files using sudo if your SSH account cannot access its home directory:
sudo grep -nE 'alsa-output-device|autoplay' /home/kiosk/.xinitrc
sudo cat /home/kiosk/.asoundrc
If the audible test confirmed hdmi:CARD=vc4hdmi,DEV=0 but the browser flag or default-audio file still names vc4hdmi0, this repair creates timestamped backups, updates both files and reboots only after finding the corrected flag. Don’t use this replacement when your actual working device is vc4hdmi0:
sudo sed -i".audio-backup-$(date +%Y%m%d-%H%M%S)" \
  's/vc4hdmi0/vc4hdmi/g' \
  /home/kiosk/.xinitrc /home/kiosk/.asoundrc &&
sudo grep -nF -- '--alsa-output-device=hdmi:CARD=vc4hdmi,DEV=0' \
  /home/kiosk/.xinitrc &&
sudo reboot
This disconnects SSH and restarts Chromium. When the player screen returns, send a new hint to test the notification.
For a custom event sound, upload a playable file under Settings > Sounds, save it and trigger the matching event. Without an uploaded event file, the app uses a built-in tone; the speaker test does not configure an event sound. Embedded live previews are deliberately silent: test the main player display, not a URL with preview=1 or preview=true. Check command -v vcgencmd for monitor controls. Restart the X11 session or reboot after kiosk changes. Some HDMI drivers or monitors do not support the same power behaviour.
NEON SIMD hardware warning
The original Pi Zero W’s ARMv6 CPU is unsupported by current Chromium. Flags won’t fix it. Use Pi Zero 2 W or newer.
lgpio is missing, swig is missing, or -llgpio can’t be found
Install python3-lgpio swig liblgpio-dev build-essential, then rerun the project dependency install from step 4.
GPIO busy, or a saved input prevents startup
A mapped pin may be claimed by another process or overlay. Remove the conflicting mapping from Admin > GPIO if the app opens, then select an unused pin. If it won’t start, back up the database and follow the narrowly targeted recovery in the original guide. The database is at /home/kiosk/escape-room-screen/src/instance/home_screen.db, not the top-level instance directory. Don’t delete the whole database.
KEEP IT ROOM-READY
Logs, updates and backups.
# Follow logs; Ctrl+C exits the log viewer.
sudo journalctl -u escape-room-screen.service -f

# Restart after backend code or environment changes.
sudo systemctl restart escape-room-screen.service
Back up /home/kiosk/escape-room-screen/src/instance/ and your protected environment file before updates. Then:
sudo -u kiosk -H bash -c '
  set -e
  cd /home/kiosk/escape-room-screen
  git pull --ff-only
  /home/kiosk/.local/bin/poetry install --only main
  /home/kiosk/.local/bin/poetry run gunicorn --version
' && sudo systemctl restart escape-room-screen.service
If the Git update or dependency install fails, resolve the reported error without overwriting local changes. Reload NGINX only after sudo nginx -t succeeds. Changes to .xinitrc, .bash_profile or .asoundrc need a new Chromium/X11 session, normally a Pi reboot; restarting the application service alone does not apply them.
Verify the screen, hints, audio and physical triggers after updating. Run one application worker for the project’s built-in live-update broker.
Make it your room.
Open Settings > Customisation in the admin panel to set the title, starting duration, colours and images. Save custom audio under Settings > Sounds, then test a full run on the main player display before opening the room. The embedded live preview is deliberately silent.
Follow the game screen customisation guide ↗
Learn hints, room controls & recorded results ↗
Back to installation guides ↗