BEFORE YOU CONNECT A PUZZLE
Which pin does what?
A colour-coded 40-pin map for Pi Zero and standard Raspberry Pi boards. Find input candidates, power, ground and the pins to leave alone.
Open the GPIO pin guideTHE BUILD STARTS HERE
Choose your hardware. Follow the steps. Bring your room screen to life — no portal login or purchase required.
Try it on your computer first. Use a Raspberry Pi when you want an always-on kiosk, physical GPIO inputs, and HDMI monitor controls.
DISPLAY → ADMIN → YOUR ROOMAll guides are public. Take them at your own pace.
An always-on room screen. Boot into Chromium, add GPIO, and open the Pi's address with no port to remember.
Pi Zero 2 W or newer · Raspberry Pi OS LiteYOUR EXISTING PCTry your room display on a Windows PC with Python, Poetry, and PowerShell.
Python 3.11+ · PowerShellTHE FLEXIBLE WORKSTATIONRun locally on a Linux computer. The commands cover Debian and Ubuntu.
Python 3.11+ · Debian / UbuntuBUILD FROM YOUR MACSet up a local display and admin panel on your Mac using Homebrew and Poetry.
Python 3.11+ · TerminalBEFORE YOU CONNECT A PUZZLE
A colour-coded 40-pin map for Pi Zero and standard Raspberry Pi boards. Find input candidates, power, ground and the pins to leave alone.
Open the GPIO pin guideMAKE THE GAME SCREEN YOURS
Set the heading, messages, colours, images and starting duration. Follow the customisation guide with the real settings screen.
Customise your game screenFROM THE FIRST CLUE TO THE FINAL RESULT
Use preset hints, event sounds, GPIO interactions and the live screen preview. Record team results and explore the leaderboard and completion statistics.
Read the room-operation guideKNOW WHAT CONNECTS WHERE
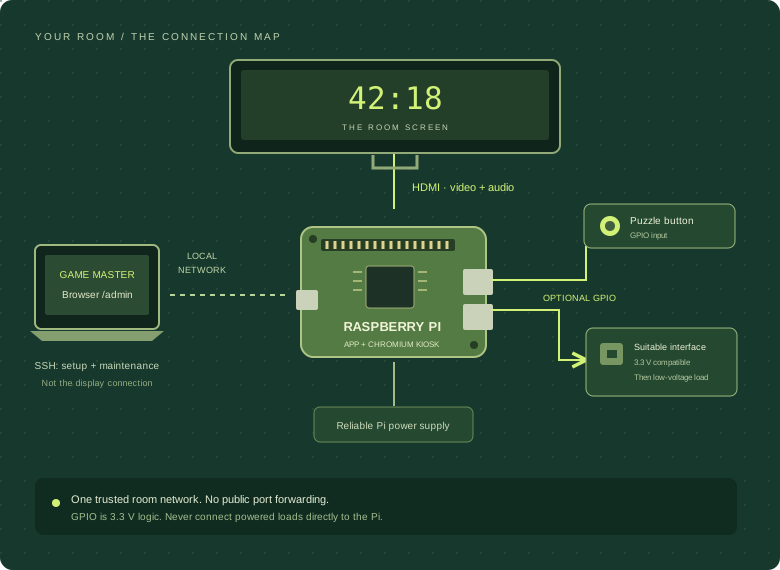
Your Pi runs the application and shows the display over HDMI. Your laptop opens /admin over the local network. SSH is for installation and maintenance — it isn’t the display connection.
A FEW THINGS BEFORE YOU START
Not on this website. The software and installation guides are available from the public project. The installed app has its own staff login at /admin, protected by the admin password you set during setup.
No physical Pi GPIO or Pi monitor-power control is available on a normal computer. You can still use the display, timer, hints, sounds and admin settings. Use Raspberry Pi OS for physical room connections.
Yes. The Pi production guide runs Gunicorn internally on 8080 behind NGINX on HTTP port 80. Open http://<pi-ip-address>/ or http://<pi-ip-address>/admin. Port 8080 by itself would still need :8080; the local Windows/Linux/macOS development guides continue to use :5000.
No. Back up your data and protected environment file, then apply the relevant changes on the Pi. The guide includes missing-Gunicorn recovery and safe update instructions. Cursor and audio configuration changes need a new Chromium/X11 session, not just a web-service restart.
The embedded preview deliberately disables audio. Test sounds on the main player display. On Pi, use the same HDMI card in the speaker test, Chromium startup flag and default-audio file, and verify the test as the kiosk account. See HDMI audio checks.
These guides are for a trusted local network. The Pi setup uses Gunicorn and NGINX, but the shown HTTP connection is not encrypted. Don’t expose the admin panel, internal port 8080 or the local Flask development server directly to the internet. Use a VPN or a properly secured HTTPS deployment for remote access.
Check the troubleshooting section in your platform guide first. If it’s a software issue, open a GitHub issue with your platform, error text and steps to reproduce. Don’t include passwords or secret keys.